Page 26 of 28
Re: 3 liter, 24 valve engine project
Posted: Sun Sep 18, 2011 5:17 pm
by MerrilGordon
Hello Garth,
Then your seats are probably easier to get in an out of. A nice feature for everyday useage. And a good way for us big guys to fit into these wonderful compact cars.
Michael !!!
Missed you at the track day last Thursday. Brad Miller was there with his worked over Milano. I think he's done a good job of engineering the car. Probably needs more time on track to advance his track skills next.
Merril
Re: 3 liter, 24 valve engine project
Posted: Wed Sep 21, 2011 1:43 pm
by Melvivio
Well seems like your really enjoying yourselves! Good stuff! More 24 Vids

Re: 3 liter, 24 valve engine project
Posted: Fri Nov 18, 2011 6:18 pm
by Michael
Seattle's first snowfall of the season is scheduled for this weekend - a good time to start tearing the GTV6 apart to fix the things that have been bugging me.
I'm installing an idle air control stepper motor which will allow me to set a target idle rev point and have Megasquirt manage the valve to achieve that. Cool! First step is to make sure the intake tract is entirely free of leaks. I always suspected the intake manifold had leaks, but it has been hard to quantify this until I built this:
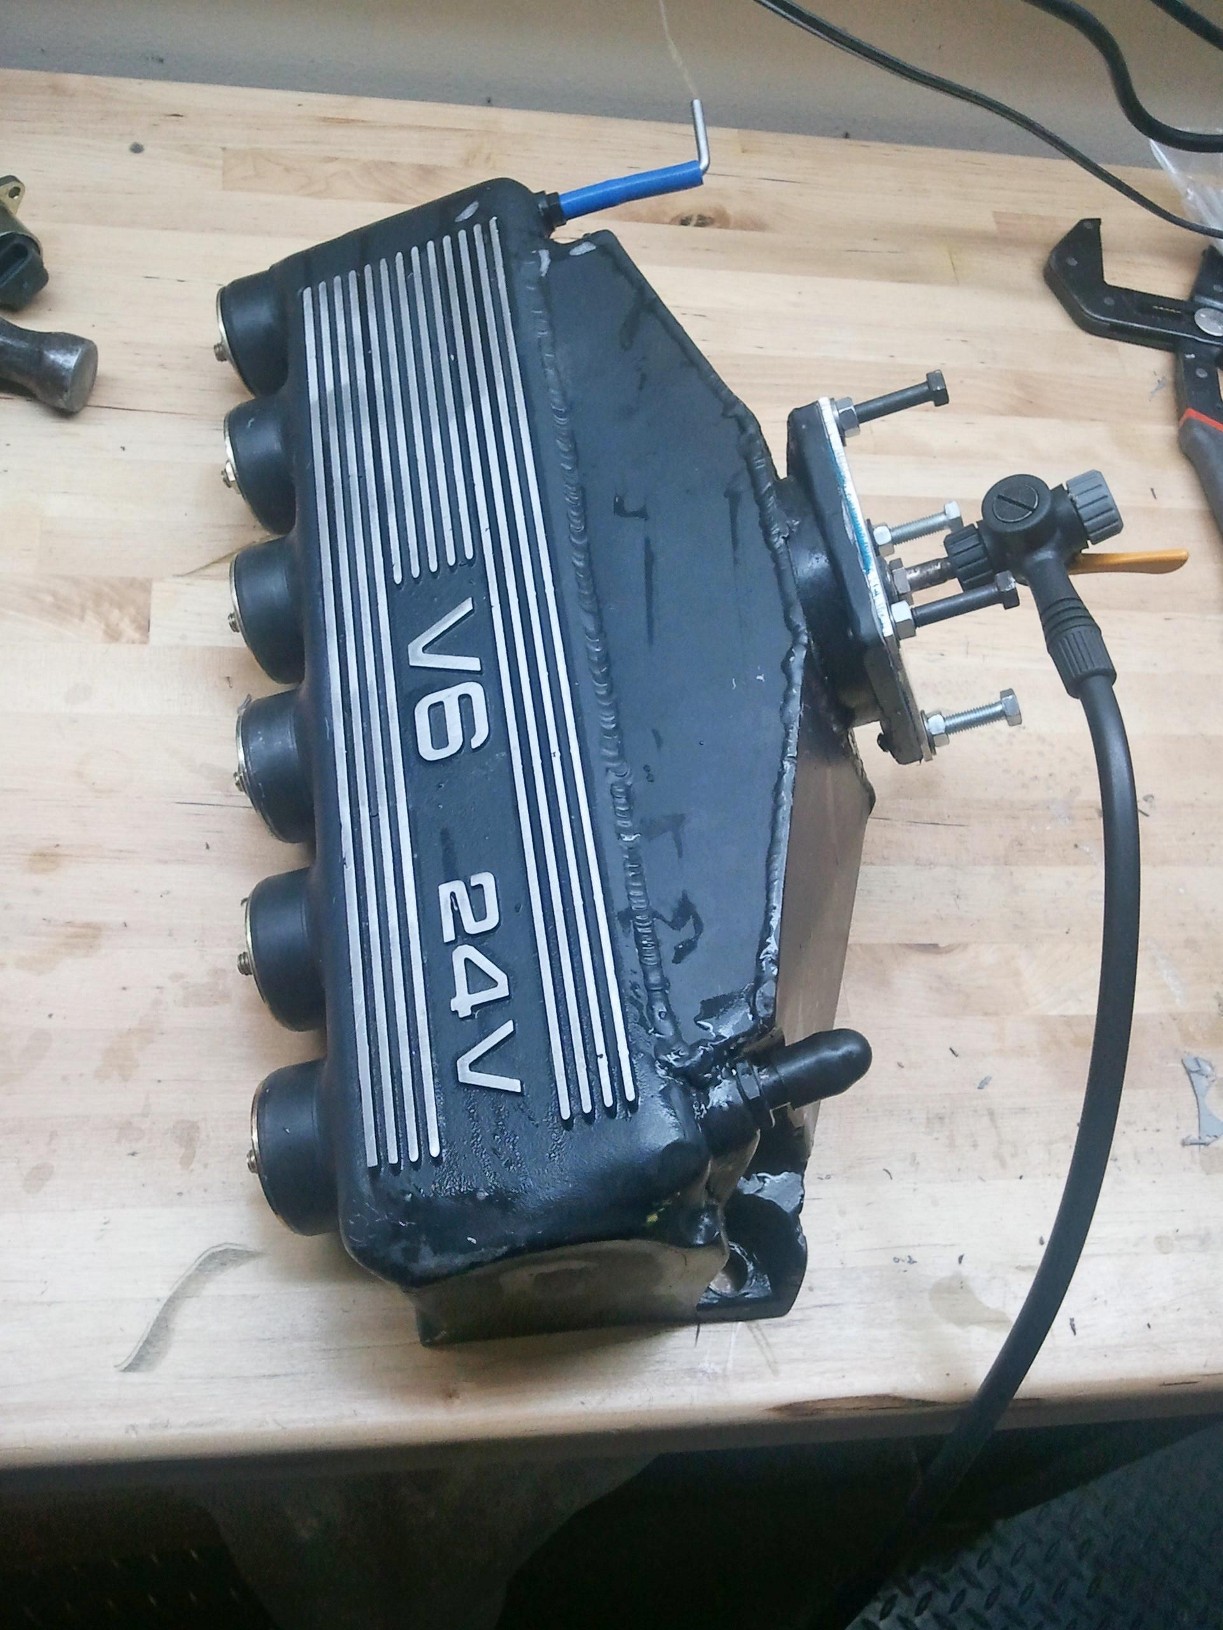
- GTV6_IntakeManifoldLeakTest.jpg (407.1 KiB) Viewed 9925 times
Essentially 6 stoppers (I think designed as 'bungs' for boat drain holes) and an aluminium plate with a Schrader valve - a bicycle pump supplies the air pressure. Wow its leaking like a sieve - in at least a dozen places.
So next week, I need to find someone who can weld aluminium ... properly this time.
I wonder if this might also be the cause of my low rpm misfire - which still persists to some degree even after switching EMS and ignition systems...
On a more positive note - I'm having my interior rejuvenated

Ron (on this Forum as 'JJ Custom Interior') has undertaken to recover my existing Verde Recaro front seats and stock rear ones ... so they will finally match and not have split seams. Ron and his wife do top quality work - check out his FaceBook page here:
http://www.facebook.com/pages/JJ-Custom ... 8998462014
I plan to post lots of pics once the work get underway.
Re: 3 liter, 24 valve engine project
Posted: Mon Nov 21, 2011 9:43 pm
by bteoh
Hey Michael,
Is that the manifold that was supplied by Dawie from South Africa? That may also explain why mine has some tuning problems previously. Not to mention some slight hesitation around the 2500 rpm mark. I may have to do the same to try to see if there's any leaks in my manifold too

Cheers,
Brian
Re: 3 liter, 24 valve engine project
Posted: Mon Nov 21, 2011 11:11 pm
by Michael
Hi Brian:
I don't think the intake manifold I have was built in South Africa / Glenwood. All I know for sure is that it was supplied by Johan van Rensburg. The original intake manifold he gave me was so poorly built that the manifold intake ports did not align with the intake runners (see picture of this below) & was thus unusable.
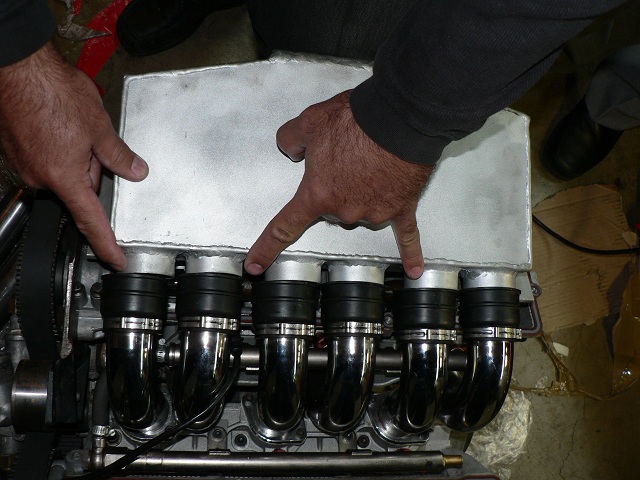
- P1010410_Small.jpg (126.6 KiB) Viewed 9867 times
I was given this one as a replacement.
Actually, I'm not certain what the effect of the leaks is. In a stock GTV6 you have an air flow meter measuring the quantity of incoming air and an ECU adjusting the fuel delivery accordingly. It easy to understand that a leak in the intake tract will create a lean condition since unmeasured air will be entering the combustion chambers. With the MAP sensor, its a little less clear to me. Theoretically whether the air is admitted through he butterfly valve or one of the myriad leaks, the ECU will still be able to measure it accurately by detecting the pressure within the manifold (?)
I hope I am wrong - I would really love this to actually solve that issue
Re: 3 liter, 24 valve engine project
Posted: Tue Nov 22, 2011 11:00 am
by kevin
You cant tune with a vacuum based ecu at low rpm if you have leaks - impossible . I had similiar problem with plenum rubbers leaking but i knew problem was not any where else as the car was running perfectly with my other intake manifold and its own rubbers.
Re: 3 liter, 24 valve engine project
Posted: Tue Nov 22, 2011 4:23 pm
by Michael
Cool - I'll test again when the leaks are fixed.
That is exactly where I see the remaining issues - at low rpms occasionally I will feel a misfire.
Re: 3 liter, 24 valve engine project
Posted: Tue Nov 22, 2011 11:02 pm
by MD
Michael,
You can use the manifold you have. Welding up holes can lead to new holes.
My suggestion is once you mark where all the existing holes are, they need to be enlarged by making a concave recess which has rough surface that forms key. Once done, apply a chemical weld product that is fuel proof. Sand down any excess. Retest for leaks. Repaint as necessary.
I once "welded" up a cracked motor cycle crankcase with this stuff and never had a problem.
Re: 3 liter, 24 valve engine project
Posted: Fri Nov 25, 2011 2:38 am
by Steve R
Michael,
Seeing as it's already structurally welded, just apply a lowish temperature solder like plumbers use on copper heating pipes to plug all the pinhole leaks
The melt / flow temp is low enough that it won't affect the alloy component or the welding but high enough that all normal engine bay temps are fine. Just use the new solder to flow into all the seams, especially where you already know the leaks are. The working temp is low enough that it can easily be done at home over a normal kitchen gas hob.
Did this myself for an aluminium supercharger inlet / outlet I made for a mk1 golf (rabbit for the USA?), after my rubbish structural welding it leaked liked a sieve, so I soldered up all the seams over the stove to plug the pinholes and all is well
S
Re: 3 liter, 24 valve engine project
Posted: Mon Nov 28, 2011 9:25 pm
by gran turismo
Michael,
Chemical welding (JB Weld or some other metalized epoxy) or low temperature braising (Alumiweld from Harbor Freight but made in USA...) would probably work. I am currently braising together an enlarged intake for my GTV6 but it is tricky and it takes alot of heat. However I guarantee there are lots of shops in Seattle that could TIG weld those holes closed for you and it would be best if done properly. Just find a shop that you can trust and mark the holes for them. If you can't find one in Seattle then I recommend Bearing Services in Portland. They did a great job welding up my GTV6's oil pan for me.
Jeff
Re: 3 liter, 24 valve engine project
Posted: Thu Mar 15, 2012 9:42 pm
by Michael
Some updates in 2012

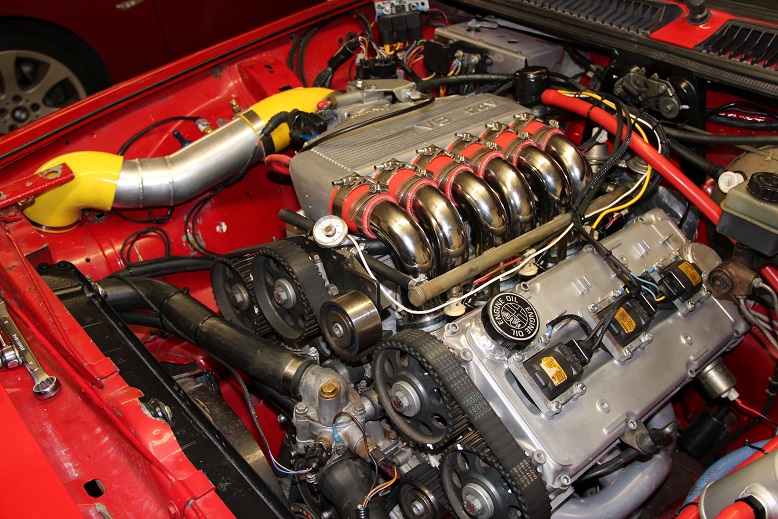
Last year, I had found massive leaks in the intake manifold. I considered the options (thanks for the ideas above) - and decided to have the coatings stripped off so I could have a better look. The welds were more awful than I thought and so I decided professional intervention would be needed. I basically had every seam re-welded and (many hours of labor later) the intake manifold is finally sealed up nicely. I used Sta-Weld in Redmond, WA - very good guy there.
I also needed to have all the cam cover welds done again and (at last) welded some areas which were supplied to me glued on, or just with holes in the covers - the pipe for the crankcase breather for example. If you have not gathered this by reading this massive build thread, I suggest you don't buy anything from 'Glenwood Alfa Performance NA' .. ever, seriously

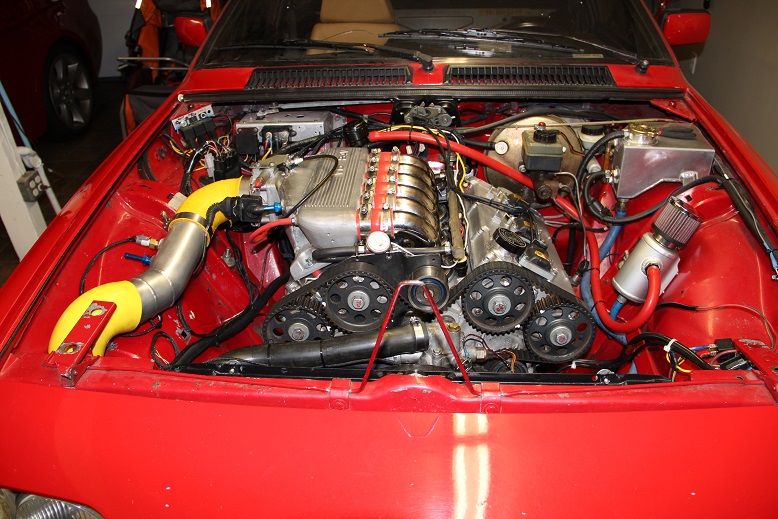
- IMG_0436.jpg (200.15 KiB) Viewed 9464 times
Also, I think the engine looks tons better without all the cheap black paint on the manifold & cam covers - this thing is made of aluminium after all!
- IMG_0438.jpg (229.38 KiB) Viewed 9464 times
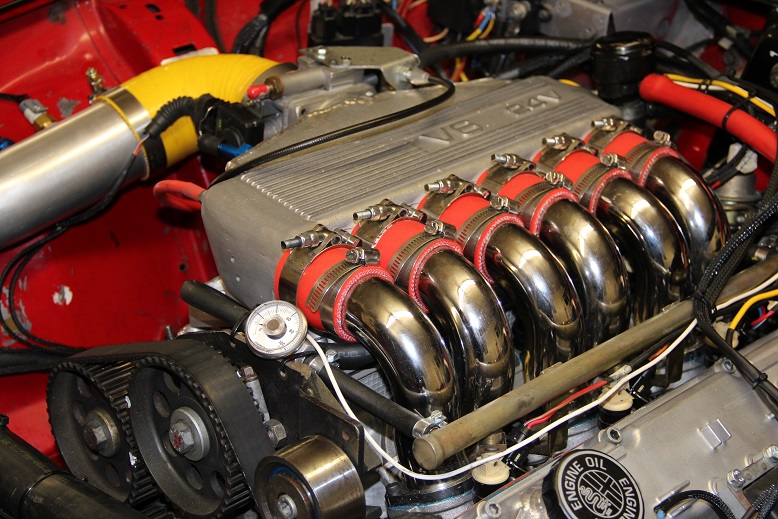
- IMG_0437.jpg (205.41 KiB) Viewed 9464 times
That unused fitting there is for the idle control valve - I plan on using my Megasquirt system to control a 'stepper' idle control valve.
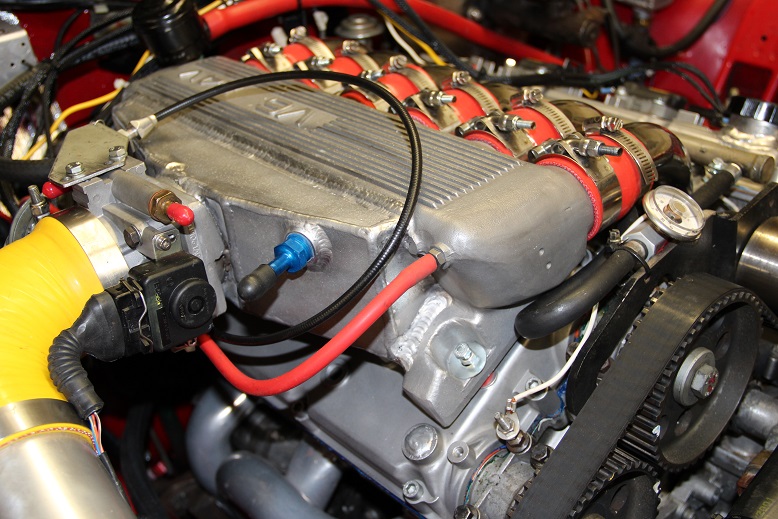
- IMG_0439.jpg (192.09 KiB) Viewed 9464 times
I also relocated the air filter to the compartment behind the headlights and made a pipe to join it all up. Actually, this was quite a fun part of the project as I used a 3" mandrel bent U pipe and then cut it up to form the right series of bends and had it welded at the same time.
http://www.mandrel-bends.com/catalog/ma ... d-655.html
The pipe is not painted, I just brushed it a bit and I think it looks just about right.
Oh, I need some more of Greg's clamps.
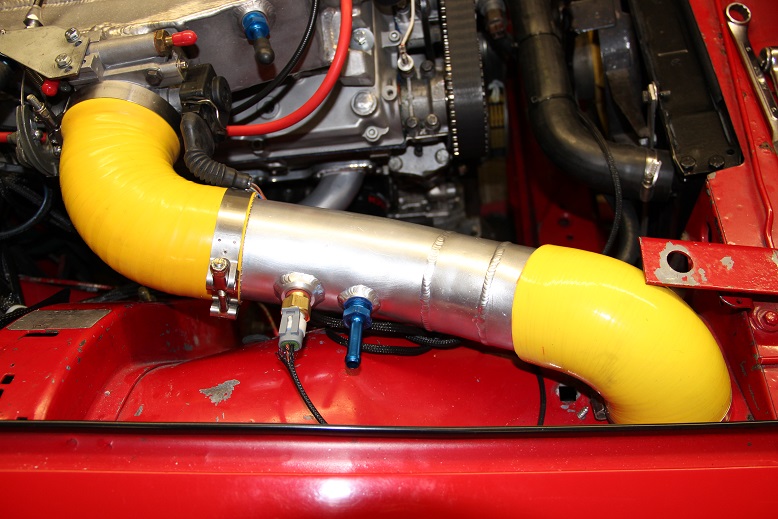
- IMG_0440.jpg (160.48 KiB) Viewed 9464 times
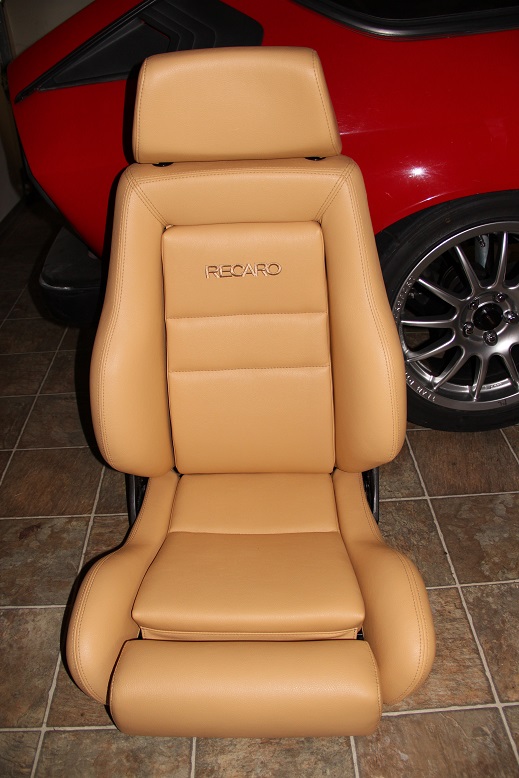
Lastly the seats - it took the upholsterer a long time to finish them, but I must say that they look brilliant & it was worth the wait! Nice work Ron!
I'm having the rear seats done to match.
The carpet looks terrible in contrast - I think I'll try a new one from World Upholstery (can anyone comment on the quality)??

- IMG_0443.jpg (129.79 KiB) Viewed 9464 times
- IMG_0445.jpg (130.36 KiB) Viewed 9458 times
Cheers,
Re: 3 liter, 24 valve engine project
Posted: Thu Mar 15, 2012 10:38 pm
by 75evo
Michael,
Wow, this project has taken a while.

The seat is simply amazing.
Also I finally got around to buying a set of stainless steel (yes!) CSC headers, so I wont be bothering you for your set
Re: 3 liter, 24 valve engine project
Posted: Fri Mar 16, 2012 10:07 am
by squadragrunn
currently i'm welding a intake plenum myself, i can tell you iys a pig to weld on

and indeed takes a huge amount of time
Re: 3 liter, 24 valve engine project
Posted: Fri Mar 16, 2012 10:33 am
by kevin
The air filter works really well behind splash guard . You always garanteed of cold air . It's amazing how many people will ask if this is an intercooler pipe
The only mod was to bend the horn bracket.
Are you gonna put a cam cover on left bank and cut out for filler cap . It will finish off the neatest 24v engine bay on the forum . ( actually that one from Greece was pretty impressive With the black cam covers
)
Re: 3 liter, 24 valve engine project
Posted: Fri Mar 16, 2012 1:50 pm
by Michael
kevin wrote:The air filter works really well behind splash guard . You always garanteed of cold air . It's amazing how many people will ask if this is an intercooler pipe
The only mod was to bend the horn bracket.
Are you gonna put a cam cover on left bank and cut out for filler cap . It will finish off the neatest 24v engine bay on the forum.
I'm on the look out for a cam cover - I did not get this with my engine - but you are correct that it would provide the finishing touch.
kevin wrote:
( actually that one from Greece was pretty impressive With the black cam covers
)
Oh snap

... no offense meant to Mr. K