
Probably said more times in this post than any other:
'I jealous..."
now I have to go order some more parts from IAP to make myself feel better.....
82 GTV6 Restore
Hello Everyone,
JJ and I are here getting ready to go out after working on the Alfa today. I am posting the progress for our Alfa so that I can remember what I did along with sharing my hobby with everyone else. Please don't get jealous. Its just a car.
Today we put in the drive shaft and gear shifter in after changing the bushings. I really don't know why I have to have a fixed cross member for the drive shaft. It really slows us down and just makes this a much longer task. I never posted any pictures of the rebuilt and balanced drive shaft so I am doing this now.
- Attachments
-
- Alfa Rebuilt Drive Shaft #3.JPG (138.62 KiB) Viewed 8974 times
-
- Alfa Rebuilt Drive Shaft #2.JPG (138.68 KiB) Viewed 8974 times
-
- Alfa Rebuilt Drive Shaft #1.JPG (148.95 KiB) Viewed 8975 times
82 GTV6 Restore
We were also able to set the torsion bars for the body height. This took alot of time since JJ wanted to get it perfect. The Alfa will sit alittle lower once we put in the AC, Hood, interior, ect. We also tweaked the Zender kit since the front tires maybe too large. We will know what to do once we have the Alfa Aligned. Here is where we stopped worked today and I am posting pictures of the Alfa with the Tires & Wheels installed.
- Attachments
-
- Alfa Restore with Tires #5.JPG (107.45 KiB) Viewed 8973 times
-
- Alfa Restore with Tires #4.JPG (141.63 KiB) Viewed 8974 times
-
- Alfa Restore with Tires #3.JPG (173.23 KiB) Viewed 8973 times
-
- Alfa Restore with Tires #2.JPG (170.25 KiB) Viewed 8973 times
-
- Alfa Restore with Tires #1.JPG (166.1 KiB) Viewed 8973 times
-
Sporttunergtv6
- Platinum

- Posts: 360
- Joined: Thu Feb 24, 2005 12:55 pm
- Location: New York, NY
- Contact:
-
Mezevenf
- Platinum
- Posts: 231
- Joined: Sat Aug 13, 2005 2:52 am
- Location: Gold Coast, Australia
- Contact:
Wow, thats awesome  I love black wheels!
What size wheels and tyres are you using?
What size wheels and tyres are you using?
Bernard M (AKA Mef - Mezevenf)
1986 75QV 3.0L 24v V6 - Silver
1985 GTV6 2.5L 12v V6 - Red
1999 166 3.0L 24v V6 - Red
NightSpec
1986 75QV 3.0L 24v V6 - Silver
1985 GTV6 2.5L 12v V6 - Red
1999 166 3.0L 24v V6 - Red
NightSpec
82 GTV6 Restore
We are using 17 x 7.5 with a 35 to 40mm offset ( 37 to 38 ??). The tires are 235 40 17 front and rear. The wheels are too big in the front. We are going to stagger the wheels and tires. The front are going to be changed to 17 x 7 with same offset. The tires are 215 40 17 and this should be my set up.
82 GTV6 Restore
Hi bteoh,
Yeah, now that you mention it, the front brakes do look small. I am so used to looking at my old wheels that I have nothing to compare it to since you do not see the brakes with my old campo's.
I am sure that it will brake better once we get the brake system online. The original brake MC is too big and now is a paper weight. We are looking at our options and will decide on this issue shortly.
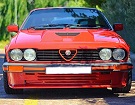
We are at a stop now for this trip. Hoping that the next trip will get my Alfa working. Just need to finish the exhaust which is going to be done this week, along with some other minor issues, (tires, interior, dyno, alignment, etc) and I hope were good to go.
We finally moved the Alfa from the warehouse and here are some pictures in the sun light.
Yeah, now that you mention it, the front brakes do look small. I am so used to looking at my old wheels that I have nothing to compare it to since you do not see the brakes with my old campo's.
I am sure that it will brake better once we get the brake system online. The original brake MC is too big and now is a paper weight. We are looking at our options and will decide on this issue shortly.
We are at a stop now for this trip. Hoping that the next trip will get my Alfa working. Just need to finish the exhaust which is going to be done this week, along with some other minor issues, (tires, interior, dyno, alignment, etc) and I hope were good to go.
We finally moved the Alfa from the warehouse and here are some pictures in the sun light.
- Attachments
-
- Alfa Exterior Pre Finish #5.JPG (178.67 KiB) Viewed 8902 times
-
- Alfa Exterior Pre Finish #4.JPG (161.09 KiB) Viewed 8903 times
-
- Alfa Exterior Pre Finish #3.JPG (151.56 KiB) Viewed 8903 times
-
- Alfa Exterior Pre Finish #2.JPG (164.04 KiB) Viewed 8902 times
-
- Alfa Exterior Pre Finish #1.JPG (190.19 KiB) Viewed 8903 times
82 GTV6 Restore
Moving along on the completion of the Alfa. The New Brake system has been decided on and it is being shipped to us. We now know that a USA GTV6 Alfa 24v Conversion needs a new Brake MC, pedal box, etc to work properly and clear the valve cover. Was not aware of this at the start since I was using the 3.0l 12V documents as a basis for the major issues.
Picked up the Alfa from the Exhaust Shop today and we are one step closer to completing this project. We learned that 2.5" is the max I could go on this conversion and that 3.0" would not clear the dion and watts linkage. Here are pictures of the new custom exhaust.
Picked up the Alfa from the Exhaust Shop today and we are one step closer to completing this project. We learned that 2.5" is the max I could go on this conversion and that 3.0" would not clear the dion and watts linkage. Here are pictures of the new custom exhaust.
- Attachments
-
- Alfa New Exhaust #5.JPG (49.14 KiB) Viewed 8767 times
-
- Alfa New Exhaust #4.JPG (51.23 KiB) Viewed 8769 times
-
- Alfa New Exhaust #3.JPG (44.8 KiB) Viewed 8766 times
-
- Alfa New Exhaust #2.JPG (55.1 KiB) Viewed 8765 times
-
- Alfa New Exhaust #1.JPG (43.07 KiB) Viewed 8765 times
82 GTV6 Restore
We decided to go with Black exhaust pipes to match the tire and trim of the car. We may coat the exhaust system and I will post this in the correct section for suggestions. Here are the last pictures of the system.
- Attachments
-
- Alfa New Exhaust #12.JPG (58.73 KiB) Viewed 8763 times
-
- Alfa New Exhaust #9.JPG (62.97 KiB) Viewed 8766 times
-
- Alfa New Exhaust #8.JPG (57.48 KiB) Viewed 8766 times
-
- Alfa New Exhaust #7.JPG (59.91 KiB) Viewed 8764 times
-
- Alfa New Exhaust #6.JPG (41.63 KiB) Viewed 8764 times

Looks tough but when it comes to servicing the vehicle eg. the drivesahft, you will need to cut the sytem apart to get it off. My suggestion is to take it off and have some flange joints installed NOW.
BTW it also a good idea to introduce a flex joint on each pipe up front to minimise vibrations.
BTW it also a good idea to introduce a flex joint on each pipe up front to minimise vibrations.
Transaxle Alfas Haul More Arse

Looks like the slave cylinder is going to have a pretty cosy environment. 
One thing is certain, you're going to hate to try to pull out the pad retaining pins...
So, does it sound as nice as it looks?
One thing is certain, you're going to hate to try to pull out the pad retaining pins...
So, does it sound as nice as it looks?
Mats Strandberg
-Scuderia Rosso- Now burned to the ground...
-onemanracing.com-
-Strandberg.photography-
GTV 2000 -77 - Died in the fire.
155 V6 Sport -96 - Sold!
-Scuderia Rosso- Now burned to the ground...
-onemanracing.com-
-Strandberg.photography-
GTV 2000 -77 - Died in the fire.
155 V6 Sport -96 - Sold!
82 GTV6 Restore
Hi MD,
I just picked up the Alfa and I did think it was interesting that I would need to cut the exhaust to remove it. Did not have enough time to discuss this with Kent since I had another appointment to deal with. Now that we have the basic exhaust system online we can tweak it for maintaince. Need to go over this with my associates and we can always modify from this point forward. I am just happy that he finished the job.
It is really tight on the passanger side rear brake area and will look at this more carefully for a possible solution to change the brake pads, etc. We are not sure that this is even possible given the no clearance over the transaxle.

CChan,
Exhaust looks great. He seems like a good welder. Although I think flanges should have been included in the many hours of work he put into it.
I would suggest the flanges at a few places:
1-right before the cats
2-between the Y pipe (collector) and the center muffler
3-Between the over the axle pipe and the center muffler
You can choose between 3-bolt flanges or V-band clamps. The V-band are a lot more expensive though, about $50/joint. A good 3/8" thick laser cut or cnc cut would seal nicely even without gaskets. You can check for flanges at spdexhaust.com.
I wouldn't worry too much about the clearence between the caliper and the exhaust since it sounds as if this car will hardly see any track events. The pads should last you a long time.
If the clearence is too small such that heat soak becomes a problem , you could always get the heat shielding material from places like Summitracing.com.
Looks good - I totally agree about the flanges though - you will need to take the exhaust off quite a bit 
For my car, I'm beginning to wonder if I should remove the spare wheel well and battery box and install a dual exhaust system using a Crossover Junctions right up front like this one:

This allows space for 2 pipes with mufflers just in front of the rear bumper.

The reason is that even with my 12v, the dyno showed that reducing backpressure helped both hp and tq markedly.
The alternative is to use side-outs for the track which is probably the more practical approach.
For my car, I'm beginning to wonder if I should remove the spare wheel well and battery box and install a dual exhaust system using a Crossover Junctions right up front like this one:
This allows space for 2 pipes with mufflers just in front of the rear bumper.
The reason is that even with my 12v, the dyno showed that reducing backpressure helped both hp and tq markedly.
The alternative is to use side-outs for the track which is probably the more practical approach.
Michael
1981 GTV6
1981 GTV6