Hi Daniel,
I really like your paint job and color. Looks really clean. Your hood looks awesome. How did you modify it?
-
Sporttunergtv6
- Platinum

- Posts: 360
- Joined: Thu Feb 24, 2005 12:55 pm
- Location: New York, NY
- Contact:

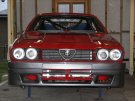
Colour is Rosso Alfa from the 156/147 range. It is a little lighter and brighter than the 1984 red. I wanted to stick with the '84 style 2 tone and I always wanted a red one (faster too  )
)
Most of the prep work was related to the bonnet mods. The rest of the car only had a few small spots of rust (not bad for a 22 year old car that has spent its last 10+ years in the weather) and the obligatory car park door dents.
Note to self (and anyone else interested in listening) - be prepared for a lot of work when you attack a bonnet (or any other large flat panel) with a grinder and welder. It took MANY hours of work to make those vents, weld a panel in the centre, weld the vents in and then get it all straight but it's all a labour of love.
So far, the only jobs I have had anyone else do are the diff (new plates etc) and the paint (and then only the outside) and it feels good to look at it now.
what steps did you take to prep the enine bay ?
I just took out the rack and al other associated bits and am about to start cleaning it down with wax and grease, then sand it to bare metal - but I need some paint and prep advice.
I just took out the rack and al other associated bits and am about to start cleaning it down with wax and grease, then sand it to bare metal - but I need some paint and prep advice.
PanchoRama
From the great master Del Compo "so, wat you wan doin?"
High Five. Sexy Time. You Lose
From the great master Del Compo "so, wat you wan doin?"
High Five. Sexy Time. You Lose
I only stripped 2 panels to bare and only because the original paint was crazed. The rest of the car was high pressure washed and sprayed with an indicator coat ($2 can of black spray in my case - shows up well against white). Then, with a few hours help from my brother in law, we rubbed the whole car down with 400 grit waterproof paper on propper rubbing blocks and plenty of water. Any high spots end up cutting through the original paint to the primer and any low spots remain black. This shows up the bits to be fixed.
I degreased the engine bay and then welded up some of the excess holes, ground them to be tidy and then gave the whole lot a light rub (same as the rest of the car) and then primed the bare spots.
While I was at it with the welder, I welded up the cracks around the sway bar mounts and reinforced them. I think anyone running 27mm or larger sway bays will find a few cracks there.
It really depends on who is doing the paint job as to how much prep work you'll have to do. It all comes down to time - theirs or yours - and how much you want to spend. I considered my car to be 10% road and 90% track, not a show car and therefore not worth spending huge $$ on the worlds best paint job. I'd rather keep the money for go fast bits

firstly, Will you be racing your car in anything higher than club events where it will need to be scrutinised? Do you need CAMS certification for the cage?
Just wondering how you get it if you do it yourself.
Secondly, How much has the material for the cage cost, and how many hours do you think it took you to build?
Do you have a plan for it?
Cheers mate.
Just wondering how you get it if you do it yourself.
Secondly, How much has the material for the cage cost, and how many hours do you think it took you to build?
Do you have a plan for it?
Cheers mate.
Waaaaaaaaay too long since any real progress, so....
Today the engine and driveline went in !!!
Front suspension (less T bars) is also in and the drop spindles do wonders for the camber gain.
A few pics to get started (I have 2 more days off work to get a sh1tload more done)
Today the engine and driveline went in !!!
Front suspension (less T bars) is also in and the drop spindles do wonders for the camber gain.
A few pics to get started (I have 2 more days off work to get a sh1tload more done)
- Attachments
-
- The 24v heart in its natural resting position
- 08-01-13 004.jpg (129.87 KiB) Viewed 7576 times
-
- Trans & rear AR bar
- 08-01-13 005.jpg (89.82 KiB) Viewed 7577 times
-
- Front Left
- 08-01-06 006.jpg (96.47 KiB) Viewed 7580 times
-
- Front Right
- 08-01-06 011.jpg (93.34 KiB) Viewed 7583 times
-
SydneyJules

- Verde

- Posts: 619
- Joined: Sun Dec 19, 2004 1:57 pm
- Location: Sydney
That's the plan Bernie
Here's some more shots of the weekend's progress - the whole driveline is in, as is the suspension.
Here's some more shots of the weekend's progress - the whole driveline is in, as is the suspension.
- Attachments
-
- Front Right
- 08-01-15 023.jpg (121.12 KiB) Viewed 7461 times
-
- Rear Right
- 08-01-15 005.jpg (106.36 KiB) Viewed 7460 times
-
- Transaxle
- 08-01-15 007.jpg (115.1 KiB) Viewed 7460 times
-
- Front end
- 08-01-15 008.jpg (113.05 KiB) Viewed 7460 times
-
- Engine in !
- 08-01-15 001.jpg (114.89 KiB) Viewed 7461 times
Hi kevin
Not sure the sizing is correct yet but I'm trying 2 x 19mm brake masters. Having no booster means that you need a different pedal length to master cylinder ratio. I did some calcs and came up with the ratio and cylinder sizes but need to do some testing - also depends on the calipers you use, piston sizes etc and the rotor sizes.
Not sure the sizing is correct yet but I'm trying 2 x 19mm brake masters. Having no booster means that you need a different pedal length to master cylinder ratio. I did some calcs and came up with the ratio and cylinder sizes but need to do some testing - also depends on the calipers you use, piston sizes etc and the rotor sizes.