With the oldest GTV6 nearing 40 years in service, a forum to document projects and restoration seems sensible.
mikekath@iafrica.com
Silver
Silver
Posts: 46
Joined: Thu Jun 03, 2021 7:32 am

Re: South Africa - 1982 GTV6 2.5 Restoration (50/100)

Post by mikekath@iafrica.com »

16.JPG
16.JPG (83.41 KiB) Viewed 153 times
17.JPG
17.JPG (146.09 KiB) Viewed 153 times
18.JPG
18.JPG (159.66 KiB) Viewed 153 times
19.JPG
19.JPG (203.1 KiB) Viewed 153 times
20.JPG
20.JPG (141.93 KiB) Viewed 153 times
mikekath@iafrica.com
Silver
Silver
Posts: 46
Joined: Thu Jun 03, 2021 7:32 am

Re: South Africa - 1982 GTV6 2.5 Restoration (50/100)

Post by mikekath@iafrica.com »

21.JPG
21.JPG (134.61 KiB) Viewed 153 times
22.JPG
22.JPG (118.89 KiB) Viewed 153 times
23.JPG
23.JPG (136.44 KiB) Viewed 153 times
24.JPG
24.JPG (167.28 KiB) Viewed 153 times
25.JPG
25.JPG (230.7 KiB) Viewed 153 times
mikekath@iafrica.com
Silver
Silver
Posts: 46
Joined: Thu Jun 03, 2021 7:32 am

Re: South Africa - 1982 GTV6 2.5 Restoration (50/100)

Post by mikekath@iafrica.com »

26.JPG
26.JPG (163.62 KiB) Viewed 153 times
27.JPG
27.JPG (233.71 KiB) Viewed 153 times
User avatar
MD
Verde
Verde
Posts: 2538
Joined: Mon Nov 22, 2004 2:37 am
Location: Brisbane, Australia
Contact:

Re: South Africa - 1982 GTV6 2.5 Restoration (50/100)

Post by MD »

Amazing dedication Mike.

Hot air problem
A tip. In hot climates, there is a cabin heat problem from the large glasshouse. To compound the problem, the engine bay chassis rails carry the cavity heat into the dashboard and connect with the so called fresh air vents. Engine bay heat enters the holes in the rails and delivers this heat into the cabin, especially from the exhaust header side.

The fix is simple. Inject expansion foam into the chassis cavity as shown. This will ensure no blending of outside air with engine bay heat.

Air Conditioning
Down the track if you are not a total purist, avoid re-installing the useless original evaporator fan box. Alfa didn't understand air-conditioning systems then. By the time the 75 came along, they got it sorted. Install one from a 75/90 series and remember there is no actual face level ducting in these dashboards so you will have to make your own connections.

BTW. Don't listen to Kevin, his eyes are too close together. :D :D Good on you Kevin :D
Attachments
Stop cabin heat.jpg
Stop cabin heat.jpg (185.89 KiB) Viewed 149 times
Transaxle Alfas Haul More Arse
mikekath@iafrica.com
Silver
Silver
Posts: 46
Joined: Thu Jun 03, 2021 7:32 am

Re: South Africa - 1982 GTV6 2.5 Restoration (50/100)

Post by mikekath@iafrica.com »

Thanks MD - useful tip on the engine heat issue!
At this stage I have left the aircon out altogether (on advice of Dawie) and will try and manage without it. Lets see! :o :o
I hope to get a lot more posts going forward now - been a LOOOOOONG journey!
KevinR
Verde
Verde
Posts: 639
Joined: Sun Mar 20, 2016 2:46 pm

Re: South Africa - 1982 GTV6 2.5 Restoration (50/100)

Post by KevinR »

Good on you Mike to see your journey ! I think I used my A/C once in SA but then it was so poor I did not bother . The joburg heat and humidity is nothing close to what MDs feels there in Oz . I have spent quite a few months there and it’s honestly insufferable so I can see his need for it . Very good tip on tbe chaissis rail MD!
On very long drives in SA ( note my GTV was my company car for many years ) I used to soak a black wet towel and leave on dash board which made a huge difference and I still could get fresh air in .
Look forward to many more pics of your build Mike !
mikekath@iafrica.com
Silver
Silver
Posts: 46
Joined: Thu Jun 03, 2021 7:32 am

Re: South Africa - 1982 GTV6 2.5 Restoration (50/100)

Post by mikekath@iafrica.com »

POWDERCOATING
So whilst the body was being prepared and painted, I had stripped down the rest of the suspension, transaxle, propshaft and other bits and pieces and elected to get them powder-coated.
I found Chamdor Sandblasting and Powerdercoating who took all of the parts, sandblasted them clean and then powdercoated in gloss black for me - I think this turned out very well! :D :D :D
These are the BEFORE pics:
IMG_6965.jpg
IMG_6965.jpg (131.28 KiB) Viewed 124 times
IMG_7035.jpg
IMG_7035.jpg (240.57 KiB) Viewed 124 times
IMG_7093.jpg
IMG_7093.jpg (134 KiB) Viewed 124 times
IMG_7096.jpg
IMG_7096.jpg (196.53 KiB) Viewed 124 times
IMG_7097.jpg
IMG_7097.jpg (180.74 KiB) Viewed 124 times
mikekath@iafrica.com
Silver
Silver
Posts: 46
Joined: Thu Jun 03, 2021 7:32 am

Re: South Africa - 1982 GTV6 2.5 Restoration (50/100)

Post by mikekath@iafrica.com »

POWDERCOATING
And this is what I received back!
Believe they did an excellent job and at a very reasonable cost if you are looking for someone to provide this service.
IMG_7124.jpg
IMG_7124.jpg (150.72 KiB) Viewed 124 times
IMG_7123.jpg
IMG_7123.jpg (145.55 KiB) Viewed 124 times
mikekath@iafrica.com
Silver
Silver
Posts: 46
Joined: Thu Jun 03, 2021 7:32 am

Re: South Africa - 1982 GTV6 2.5 Restoration (50/100)

Post by mikekath@iafrica.com »

ELECTROPLATING
Wanting to ensure a real nut and bolt restoration, I had invested in a sandblasting unit from Adendorff (yes the reason they are doing so well is because of me !!! - have spent a pretty fortune there over the last while!!).
Maybe for another post but the system is not as simple to use as you may think. MANY things need to work together to have a sandblasting experience that is both efficient and effective. The most important thing is LOTS of air volume and pressure. I have a 150l W configuration compressor and quite frankly believe you should have nothing less than 200-250l and even better on 3 phase.
I have been using aluminium oxide as the substrate for the tougher cleaning and very small glass beads for the more sensitive items like aluminium.
With items nicely cleaned up, it was time to figure out how to do plating myself. This would be ZINC plating with a Yellow passivate to create not only a robust coating but also that visually appealing gold iridescent colour.
I initially made us of Tshwane Plating Suppliers to get the chemicals and zinc anodes, but more recently go to Metalchem in Edenvale.
So here is an overview of the process. IT IS TIME CONSUMING but also very satisfying!
Metalchem to get plating supplies from in Edenvale
00.jpg (21.78 KiB) Viewed 124 times
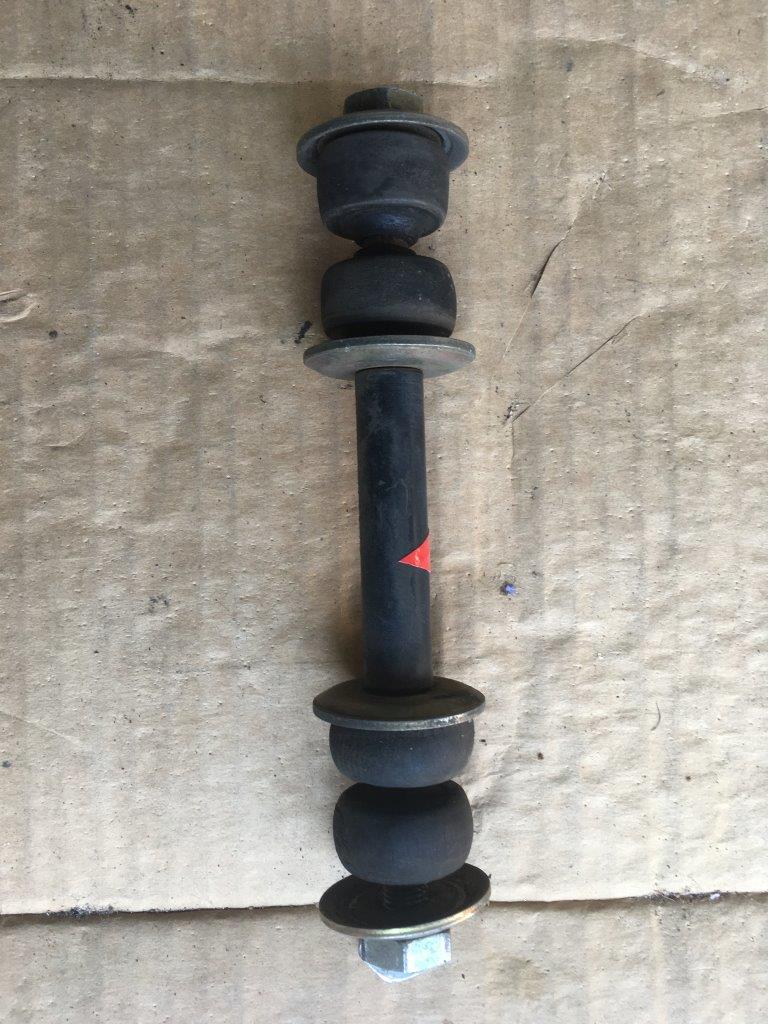
Example of item to be restored
01.jpg (135.8 KiB) Viewed 124 times
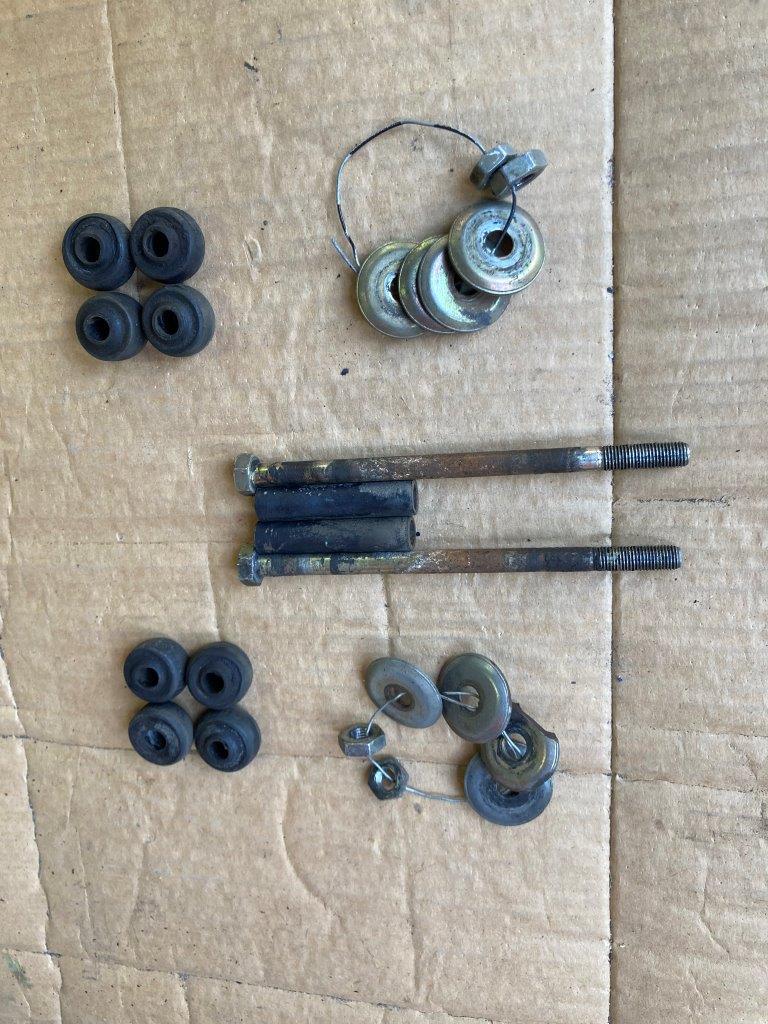
Rear suspension bolt stripped down
02.jpg (163.76 KiB) Viewed 124 times
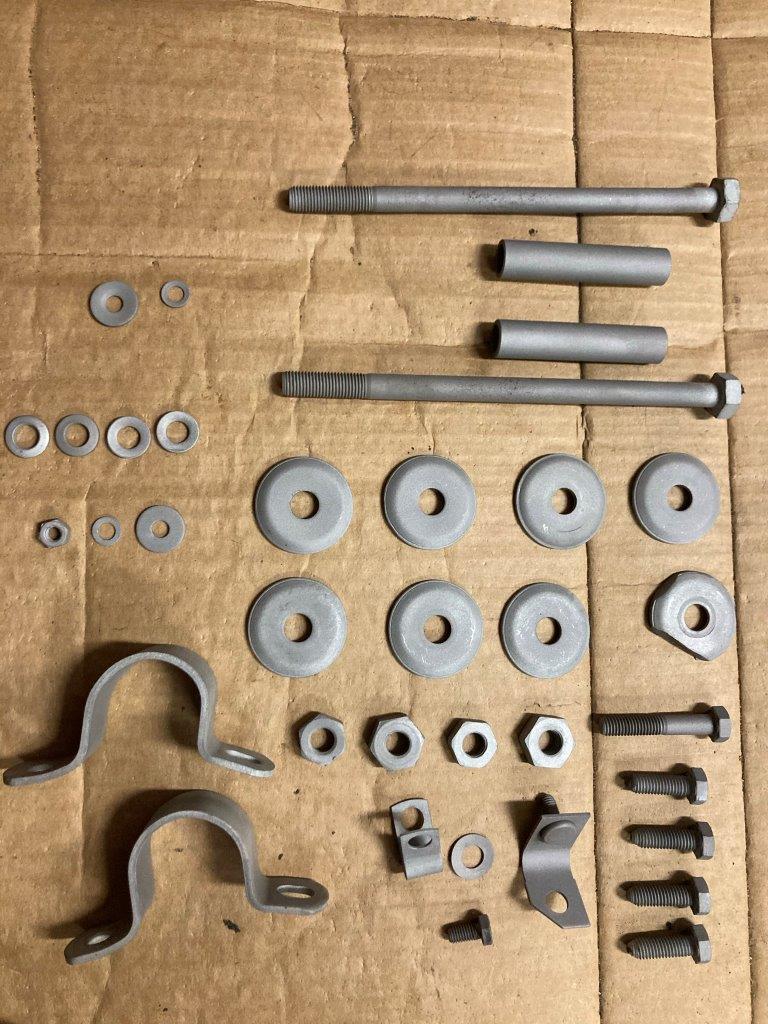
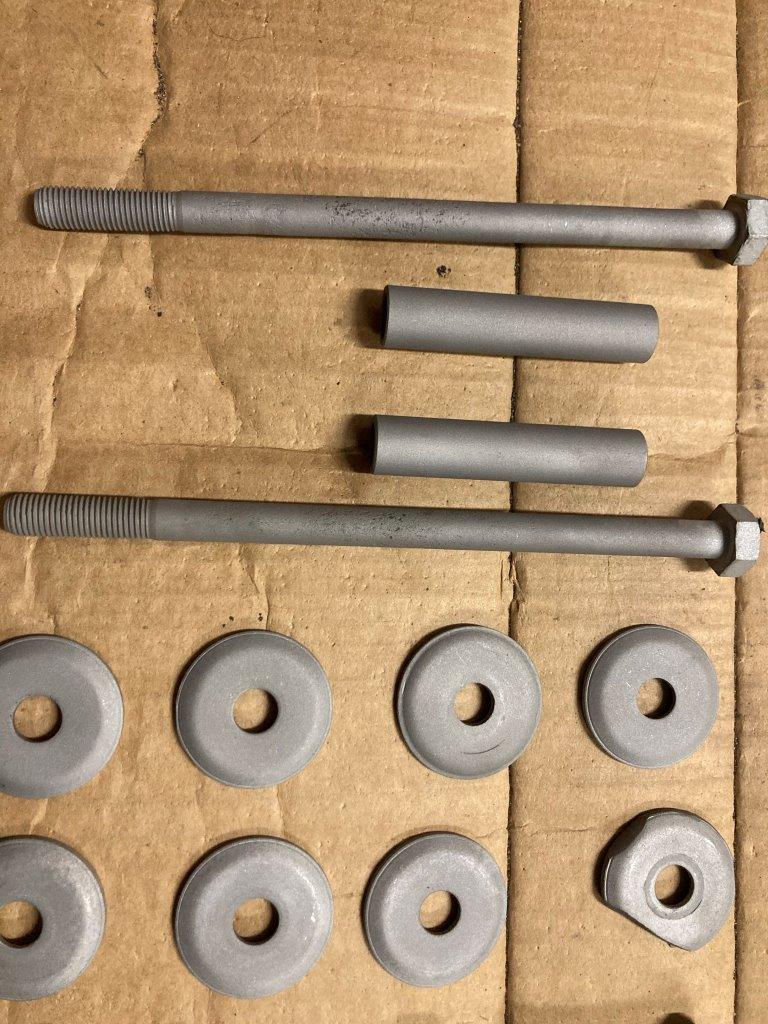
Sandblasted and really cleaned up
03.jpg (159.65 KiB) Viewed 124 times
Ready for chemical cleaning
04.jpg (164.14 KiB) Viewed 124 times
mikekath@iafrica.com
Silver
Silver
Posts: 46
Joined: Thu Jun 03, 2021 7:32 am

Re: South Africa - 1982 GTV6 2.5 Restoration (50/100)

Post by mikekath@iafrica.com »

ELECTROPLATING CONTINUED
Please read the descriptions under each picture to understand the setup and plating process
Bought plastic tank (15l) with zinc plating solution filled up
05.jpg (122.89 KiB) Viewed 124 times
Zinc anodes placed around the tank, go to the +ve of the power source
06.jpg (126.13 KiB) Viewed 124 times
Ready to start. Copper pipes across the top, connected to -ve and this is where you hang the items using copper wire
07.jpg (102.55 KiB) Viewed 124 times
My bench power source, can go up to 10amp, but plating usually in the 2amp to 4amp range (bigger items more current)
08.jpg (111.48 KiB) Viewed 124 times
All items cleaned in a 5% HCL solution prior to plating. This chemically cleans the metal. You can see the bubbling coming off the item.
09.jpg (58.76 KiB) Viewed 124 times
mikekath@iafrica.com
Silver
Silver
Posts: 46
Joined: Thu Jun 03, 2021 7:32 am

Re: South Africa - 1982 GTV6 2.5 Restoration (50/100)

Post by mikekath@iafrica.com »

ELECTRPLATING CONTINUED
See comments below pictures
Items now being coated in the tank. Usually run for about 30 minutes.
10.jpg (120.52 KiB) Viewed 124 times
Once completed, remove and rinse. Then rinse again in a very light acid solution
11.jpg (68.22 KiB) Viewed 124 times
Then dipped into the yellow passivate solution. Only needs 2-4 seconds.
12.jpg (71.91 KiB) Viewed 124 times
mikekath@iafrica.com
Silver
Silver
Posts: 46
Joined: Thu Jun 03, 2021 7:32 am

Re: South Africa - 1982 GTV6 2.5 Restoration (50/100)

Post by mikekath@iafrica.com »

ELECTROPLATING FINAL
See comments below pictures
Items removed from tank and left to dry for 24 hours
13.jpg (94.25 KiB) Viewed 124 times
Items nicely coated
Items nicely coated
14.jpg (58.54 KiB) Viewed 124 times
Original item re-assembled
15.jpg (52.18 KiB) Viewed 124 times
mikekath@iafrica.com
Silver
Silver
Posts: 46
Joined: Thu Jun 03, 2021 7:32 am

Re: South Africa - 1982 GTV6 2.5 Restoration (50/100)

Post by mikekath@iafrica.com »

FRONT BRAKE REBUILD
The stripping and rebuild process for the brake calipers once removed needed to be done.
The calipers were removed, stripped down, sensitive parts closed off with tape and then components sand blasted, painted or plated.
The smaller rubber seals between the spacers were obtained from Summit Brake & Steering in Rivonia - contact is Frank!
I also elected to get them to strip and rebuild the brake booster - something I was not prepared to do myself.
Brake caliper off, before stripping
01.jpg (78.47 KiB) Viewed 71 times
Brake caliper split apart
02.jpg (148.33 KiB) Viewed 71 times
All components of the caliper stripped, ready to be restored. I did land up getting new brake pistons from Caribiner parts in Bryanston (Doug Kirkby)
03.jpg (103.31 KiB) Viewed 71 times
Sensitive caliper areas were taped off with strong duct tape before sandblasting
04.jpg (89.92 KiB) Viewed 71 times
All parts nice and clean before painting or plating
05.jpg (151.51 KiB) Viewed 71 times
mikekath@iafrica.com
Silver
Silver
Posts: 46
Joined: Thu Jun 03, 2021 7:32 am

Re: South Africa - 1982 GTV6 2.5 Restoration (50/100)

Post by mikekath@iafrica.com »

FRONT BRAKE REBUILD - Continued
Calipers painted in high heat red paint, with new brake piston fitted as well as new piston seals obtained from EB Spares in UK.
06.jpg (116.01 KiB) Viewed 71 times
All front disc parts ready to be fully re-assembled. Note the 4 small rubber seals for the caliper spacers - these have to be the right fit. Obtained from Summit Brake & Clutch in Rivonia. These were still the original brake pistons that were replaced with new ones.
07.jpg (74.52 KiB) Viewed 71 times
Caliper back together - ready to be fitted back onto car
08.jpg (98.85 KiB) Viewed 71 times
Caliper installed back onto front strut. The green pads are from EBC brakes in the UK
09.jpg (140.45 KiB) Viewed 71 times
Nicely back together and new brake discs fitted (slotted and grooved) also from EBC Brakes in the UK.
10.jpg (125.09 KiB) Viewed 71 times
The process was repeated for the other brake caliper.
User avatar
MD
Verde
Verde
Posts: 2538
Joined: Mon Nov 22, 2004 2:37 am
Location: Brisbane, Australia
Contact:

Re: South Africa - 1982 GTV6 2.5 Restoration (50/100)

Post by MD »

Hi Mike,
Enjoying your work !
By the look of what you are doing and if you keep it up, this car will be worth a motza. The direction seems to be keep it original.
Along those lines, if you want to take some advice from an old fart, resist the temptation to deviate from that approach.
Collectors are impressed and value originality. Enthusiasts value effective modifications. Avoid the temptation to mix the two unless the end value of the vehicle is not relevant. No matter how well intended, finishing up with somediss and somedat is only of value to the owner and will plummet any resale value.

No disrespect intended but the presentation of the front brakes rebuild is the first example. Functionality is great. Presentation looks nice but is not original. Pads and rotors aside, the red calipers and gold hub reduce the effect of originality.

By all means follow your heart but if you can, decide what it is you want to achieve, a rare South African beauty or just a nice car.
Transaxle Alfas Haul More Arse
Post Reply